| Overview | Schedule | Announcements | Resources | Assignments | Home |
| Read | The PracticeGUI class uses several GUI components from the
swing library:
Note that each of the methods are private. This is because in this particular case none of these methods are to be used by other classes. Note also that some of these methods call other methods. For example makeFrame calls makeMenuBar and makePanel calls makeRadioButton. This is done for a couple of reasons: 1) To reuse code. makeButton and makeRadioButton are each called two times and 2) to allow the length of code in methods to be relatively short for readability. We could have reduced the number of methods considerably and put all of the code in makeFrame, but then makeFrame would be much longer and harder to read. |
| Create |
Create an instance of PracticeGUI and observe the initial display. Reconcile the display with the code that produced it. Why, for example, does the OK button appear on the left side of the window? Or the Radio Buttons in the center? Click on the various clickable components and observe the results. |
| Add |
Add a new label to the layout. This should be done in the makeFrame method, and you should use the method makeLabel to do it. Make the caption to the label "PracticeGUI: Fun with GUI" and add it to the NORTH region of the layout. The variable you use for this label should be local to makeFrame. Note the fields of the class: frame, frameContentPane, stateLabel, rbOne, rbTwo, and buttonOKClicks. There are several other components in the class that are used, but are not declared as fields. This is because they are not modified directly by the class. The label you just made, for example, will never change during the life of the class, so there is no need to make it a field of the class. |
| Add |
When you clicked the OK button, a count of the number of times it had been clicked was displayed in the bottom label of the GUI. This did not happen when the NOT OK button was clicked. Modify the class by adding a new field, buttonNotOKClicks, so that the number of times this button is clicked will be reported too. You will need to modify the actionPerformed(ActionEvent event) method and make changes in a couple of other places too. |
| Modify |
You may have noticed that clicking on a RadioButton more than one time in a row, causes the button to be selected and then not selected. But the RadioButton label and the label in SOUTH both indicate that is it selected. Modify the actionPerformed method so that the RadioButton is actually black (selected) whenever it is clicked. |
| Complete |
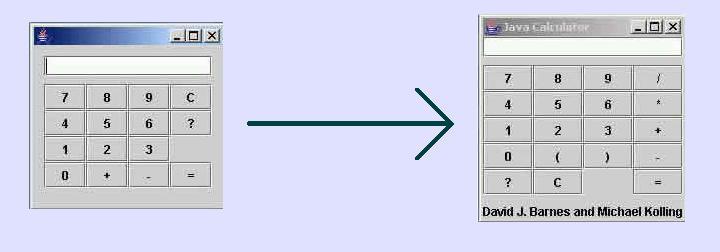
Work with your partner to start the project 2 calculator program. The initial version of this project is in the Lab5 folder and called calculator. It is a working calculator that does addition and subtraction. The goal is to take the GUI on the left in the figure below and add /, *, (, and ) buttons to achieve the look on the right. Don't worry about the caption on the bottom of the calculator GUI at this point. Once you have the new buttons located in the correct position, add else-if statements in the actionPerformed method to handle the /and * buttons. Do not worry about the ( and ) buttons now. To do this you will be modifying the UserInterface class by adding calls to calc.mult() and calc.divide(). Next, add code to the CalcEngine class to have a working calculator with all of addition, subtraction, multiplication, and division finished. To do this, add the mult() and divide() methods to the CalcEngine class imitating plus() and minus() methods. Lastly, modify the calcResult() method in CalcEngine to fill in the calculation required for * and /. Don't forget that division by 0 is not legal and if the denominator is 0 you should set the result to 0 and report an error using System.out.println. The code in calcResult to modify is:
        switch (operator) {
        case '+':
            result = intLVal + intRVal;
            break;

        case '-':
            result = intLVal - intRVal;
            break;

        case '*':
            // Mult code goes here
            break;

        case '/':
            // Divide code goes here
            break;

        default:
            keySequenceError();
            break;
        }
|
| Overview | Schedule | Announcements | Resources | Assignments | Home |
![]()
![]() DePauw University, Computer Science
Department, Spring 2005
DePauw University, Computer Science
Department, Spring 2005
Maintained by Brian
Howard (bhoward@depauw.edu).
Last updated